18" Wheel Upgrade: not that easy...

Hi all,
I am the happy owner of a Strida 5.0 since 2008 and I ride it almost every day to commute between home and office (about 4 km/day).

I would say I have covered around 2000 km in total. So far, so good, I was very happy with my little Strida, but the only annoying thing in my view was the limited top speed.

Since my tyres were good to replace, and the plastic freewheel was also giving some signs of fatigue, I have ordered a new aluminium freewheel together with a 18" wheel upgrade for Christmas.

Today I finally took the time to mount the wheels on my Strida. Although the front wheel was pretty straight forward to install, mounting the rear wheel was much more of a pain !

  1. First of all the old freewheel (the black one made of plastic) has been terribly hard to remove. I had to tighten the old wheel in a vice (vise ?) and ruin my hands on the small and sliping piece of metal supposed to fit in the thing. That part only took me at least 20 minutes.

  2. Then to reinstall the rear wheel I had to remove the “snubber system”, otherwise the wheel would not fit. That means the new freewheel is a little bit larger than the old one (1 mm more I would say).

  3. I had to put an extra spacer between the brake shoe and the bike to recenter the disk in the brake shoe. It seems again due to the difference in size between the two freewheel cogwheels.

I had hard time to tune the rear brake to something good.

Now that everything is in place; I have noticed that the belt is now slipping a lot :frowning: It’s a pity because until now tooth jumps would only happen during hard push AND wet weather.

I tried to adjust the belt tension but I simply could not manage to unscrew the screw under the bike ! I even twisted two screw drivers… Crazy !! :sunglasses: Is there a special thing I should know to unscrew this thing ?

Alas, I will try to adjust the snubber again and hope that it will solve the problem.

In conclusion, as you see, the upgrade (at least for me) was not such an easy task, and I still have some problems with the belt to investigate and fix.

Some pictures:

Do you think the belt is too loose ?
Hi Googleg,

welcome to Stridaforum!

I’m sorry to hear about your troubles, doing the same upgrade a few months ago I had no problem, but my Strida’s are 5.2, they seem to have a different snubber.

I guess your snubber looks like this:

http://picasaweb.google.co.uk/Human.Amp/StridaTech#

(Pictures by Human Amp)

This is the 5.2 snubber:

Do you see the difference?

For my opinion the belt seems to be to loose.
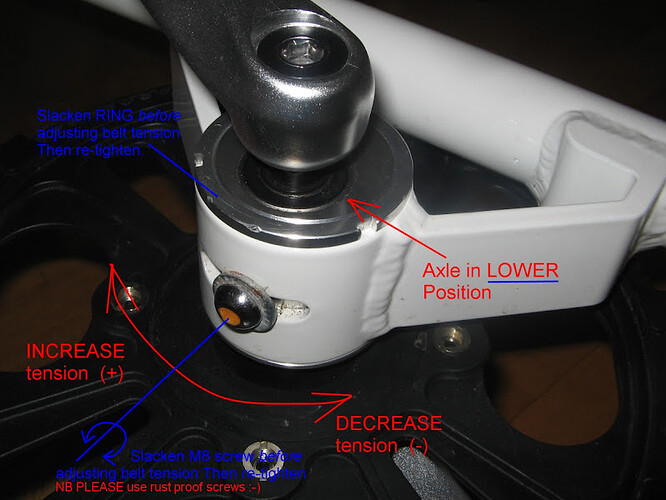
To adjust belt tension please refer to pic 7 of Human Amp’s Picasa album, and look here:
[url]Adjusting belt tension?]

At first, you have to loosen the big groove nut with the correct tool (doing this by a hammer and a drift punch might damage the groove nut), then you should be able to loose the tension bolt with a 6 mm Allen key ( you actually used a screwdriver ?).
Typically the tension bolt is fixed by Loctite glue.

Thanks for your pictures, I noticed something strange on them:
As far I know, brake discs are usually marked with a rotating direction arrow (like a tyre).
You will find that arrow on the Strida front disc, the rear disc is not marked (!).
So, looking at your pictures, I think you mounted the rear disc the wrong way…

Here is some additional information from Hongkong Strida Club http://www.hkstrida.org/:

Best regards

Dear Blackstridaaustria,
Thank you very much for your detailed answer.

You are right about the rear disc: I have mounted it in the wrong direction. Congrats for catching this detail on the pictures ! :sunglasses:

Unfortunately for the time being I don’t have the time to disassemble everything to put it in the right direction. I don’t know if it makes any difference, because to me it looks like a perfectly symetrical flat piece of metal, but at the same time it could maybe explain why I had to introduce some spacers (about .5 mm) to recenter the disc into the brake shoe. And if there is a drawing of an arrow on it, there must be a reason !

Now; talking about the snubber, I’m pretty confident this was the cause of the tooth jumps. I checked and it was completely loose, so basically it was like riding the Strida with NO snubber. Tonight I fixed the thing, and tomorrow I will see if this simple change will solve the problem.

For the belt tension I used (and ruined) Allen keys, not screwdrivers, sorry for the misleading message. Anyway I really could not unscrew the big groove nut. I’m glad to see the picture, it looks like you need some special tools if you really want to do it in the best conditions. If the snubber fix is not enough to stop my belt from slipping, I’ll probably try to find a Strida reseller to have it adjust the belt tension for me.

All in all I’m still happy with my upgrade, the gain in term of speed is noticeable and really cool.

One last thing however: now when the bike is folded the two mud guards have the tendency to tangle up, and sometimes the two wheels will rub one against the other with a squeaking noise… Not a big issue, but it’s annoying.

Thanks for your help.

Hi Googleg,

the complete Schlumpf tool set (34 €) for mounting and maintaining the Strida speed drive contains this tool. I suggest you write to your countryman Mr. Schlumpf, maybe he sells the big tool separately.
http://www.schlumpf.ch/

…for me the mudguards are botch :confused: (in Wien: “Pfusch”)…

B. r.

Hello BSA and Googleg

A Korean rider added a circular magnet as a spacer :wink:

Bintz

Thanks Binch, that’s a good idea!

Ok thanks for the tip, it’s good to know that I’m not the only one having this issue with the wheels rubbing each other.

Now, coming back to my problems, unfortunately adjusting the position of the snubber was not enough to prevent the tooth jumps. It’s a little bit better, but still far from the “0 tooth jump” of before the upgrade :frowning:

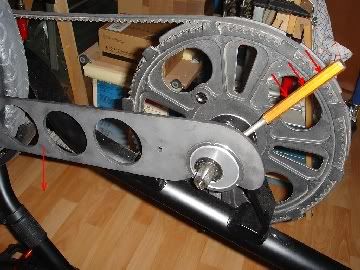
Here is a picture of my snubber. As you can see the gap is minimal, if not optimal. The belt is not in permanent contact with it.

Now, I don’t know how it was before. Maybe it was touching the belt… As the traces on the belt itself may suggest. If I look at the picture you posted above, I can probably try to reduce the gap even more, but I really wonder if this is the way to fix the problem.

I really feel depressed. I used to have a slow Strida that was working like a charm, now I have a fast Strida that cannot climb the smallest hill. :angry:

Now on the other hand I realize that due to the change in the position on the bike I certainly can give less push with my foot when I start riding, thus needing more push on the pedal. But this cannot explain the whole problem.

Anyway, my last hope now is to find a way to adjust the belt tension. I’ll try to pass by a bike work shop over the week-end since I do not have the right tools. I’m a bit worried because it’s very unlikely that the shop will know exactly what to do, so I will have to tell them how to proceed… But even I am not sure ! Could you please confirm that 1.I first need to unscrew the big groove nut with the special key and the 2. then unscrew the nut that is right under the bike with a simple allen key ?

When I first tried I did not unscrew the big bolt screw before trying the one with the allen key. Is this the reason I could not manage to budge the last nut ?

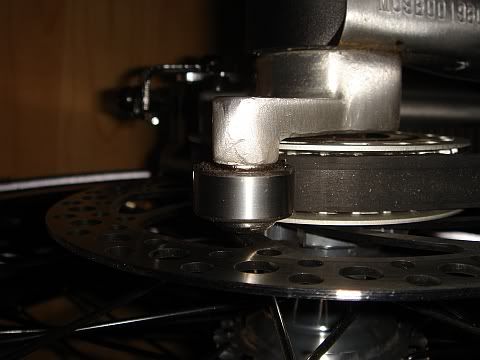
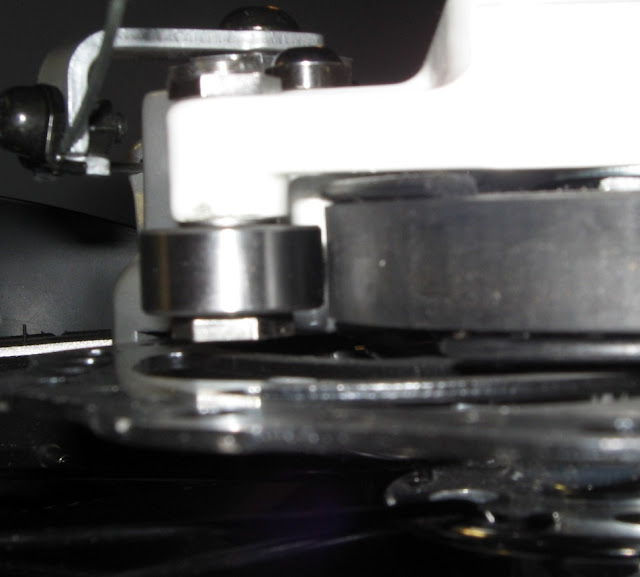
Now, coming back to my rear break disc, and just for info, here is a picture of the calliper with the spacer (the white thing) I needed to add in order to re-center the disc into the gap.

For now the rear brake is working OK so I’m not going to touch anything.

Thank you all for reading, sorry for the pictures, taken with my crappy blackberry.

Hey come on, head up…together we are surely able to fix that… :sunglasses:

Seeing the picture below they should know what do do, if not - go to the next shop.


http://picasaweb.google.co.uk/Human.Amp/StridaTech#
(Pictures by Human Amp)

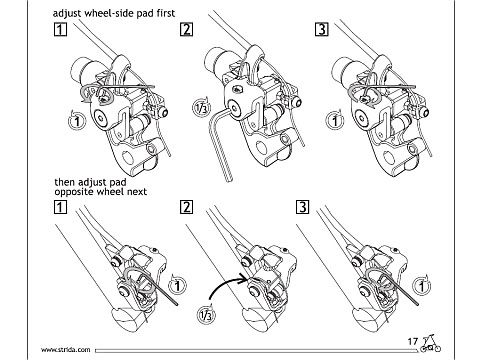
To adjust the brake pads please refer to the owners manual, page 17.

http://www.strida-europe.com/english/images/Manual%20Strida%205.x%20and%20Strida%20Mini.pdf

Might somebody affirm, please?

Thanks!

Dear BSA,
I took a careful look at the picture of the snubber you posted above and I noticed that, by comparing the proportions on screen of the two picture, the gap in your example was smaller than mine.

The size of the gap on my bike was a bit smaller than 1 mm, which seemed small enough to prevent the belt from going up to the point it would slip. But I gave a try and reduced it as much as I could, to the point that only a sheet of paper could fit between the snubber and the belt.

Guess what ?

Next day I took my bike to go to work and voila: no more tooth jump, at all, even when pushing very hard on the pedals.

I’m back in business :stuck_out_tongue: That’s so great. I feel really good now that I can enjoy a fast Strida.

I still have two issues, first a small one: some noises coming from the rear wheel, I will probably need to adjust the brake again or put some oil or grease between the freewheel cog and the frame, second is that annoying issue with the wheels rubbing against each other when the bike is folded, and for this by seeing the system from our Korean friend, I will probably have to be creative.

Thanks for your help and support, it really helped me fix my problem.

Good evening Googleg,

I’m glad to hear you are back in business!

Did you read this post: [url]Strida 5.0 "clicking" noise - #7 by Bartman236] ?

Bartman236’s solution worked for the noises on my Stridas perfect!
(I skipped step 1 and used in step 3 instead of copper silicone grease)

B. r.

Thanks, thanks again. I suppose you did remove the wheel to do that.

It’s clear on the picture that the freewheel is rubbing against the frame:

Googleg, please look carefully between the tyre and the brake disc!
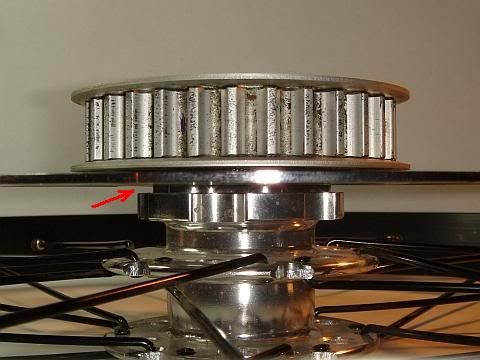
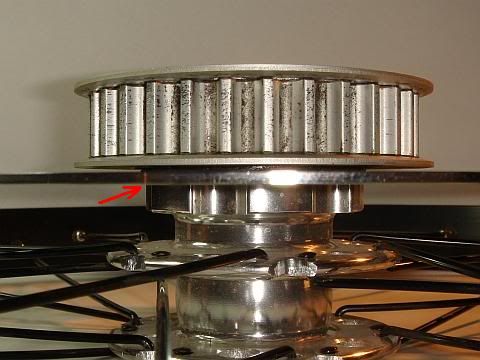
Then, please tell me, does it look like picture A or B ( Do you have the red arrowed gap or not?):

[size=150]A[/size]

[size=150]B[/size]

Thanks!

Indeed, I do have a gap, but not at the place mentioned on your pic ! In my case there is a spacer between the disc and the freewheel (see below).

I tried that yesterday, my first thought was that you have accidentally mounted the brake disc in the wrong way (pic A).

Now I’m wondering about the spacer, I have four wheelsets (2x16" and 2x18"), none of them has the spacer? :confused:

Dear members, please tell us whether you have this spacer, too?

The spacer is for the plastic freewheel only. You have to take off the spacer when you install the aluminium freewheel.

Thanks Amuro, that’s it!

Oh man … That makes sens ! And this is why I had to introduce spacers to re-center the disc into the brak calipper and adjust the rear brake.

I feel so stupid. How could I guess this one ? The two freewheels look so similar. I’m a bit surprised though, because the spacer in question is quite big, I can’t belive I can just remove it and forget. Too bad I don’t have the plastic freewheel with me anymore, I would have liked to compare the width of the two.

Now I guess I only need to take 1 hour or 2 on my free time to remove the spacer from the wheel.

Too bad for me I will have to remove the freewheel (hope this will be easier than removing the plastic freewheel), readjust the snubber, remove the spacers on the calipper and also readjust the brake pads !

On the other hand this will maybe help with the wheels rubbing, because the rear wheel will be closer to the frame.

:frowning:

Thanks AmuroLee and BSA.

You see - together we made it! :smiley:

Here is another post talking about how to upgrade the freewheel from a plastic one to an aluminium one. :wink:
[url]Strida 5.0 upgrade DIY]

This morning after my breakfast I took 40 minutes to redo everything from scratch and remove the space/washer.

It’s much better now, the freewheel is not rubbing against the frame any more.

Some pictures:

I changed the position of the disk back to normal:

The aluminium freewheel has a kind of “built-in” washer…

The other side of the freewheel:

You can see the traces of the freewheel rubbing against the frame:

The spacer/washer, not to be put back in place:

Did some cleaning:

The freewheel was easy to remove, not like when I had to remove the plastic freewheel:

Wheel assembled:

My workshop…

Snubber back in place, I hope I won’t have to adjust it 10 times, the gap seems to be good:

My only concern is that without the spacer the belt is pushed against the side of the cog, before that it used to be somewhat more centered…

Of course I also had to adjust the brakes. I could not do a test drive because I had to run for lunch with some friends, I’ll tell you tomorrow.

Thanks again for helping me.