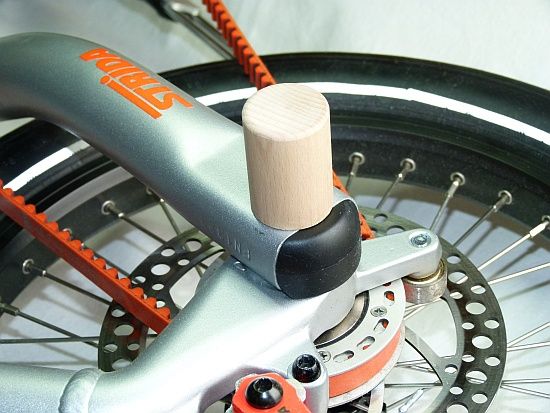
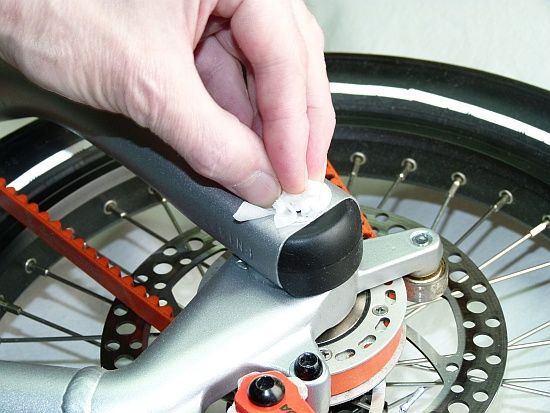
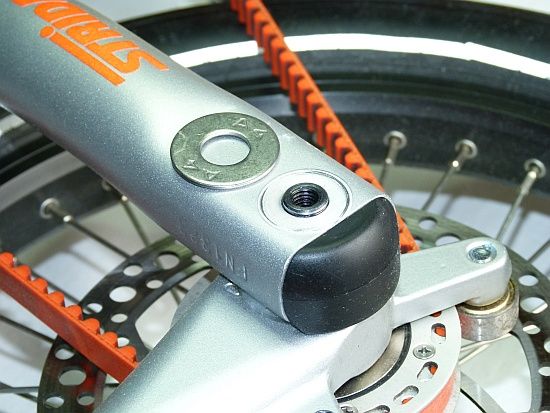
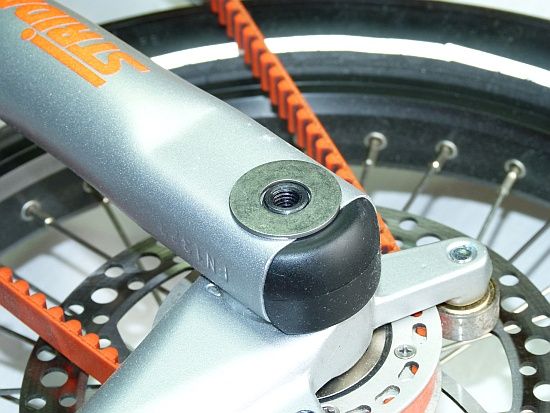
rear hinge reinforcement - heavy duty

Edit 05.08.2019:

Many thanks to Ludwig and Martin from Germany - your stimulations told me finally where to find the right path! :sunglasses:

Project now paused due to ground-breaking new insights.
Massively enhanced rear hinge solution already in testing,
details will be edited soon.

:mrgreen:

I. Preface

Hi fellows,
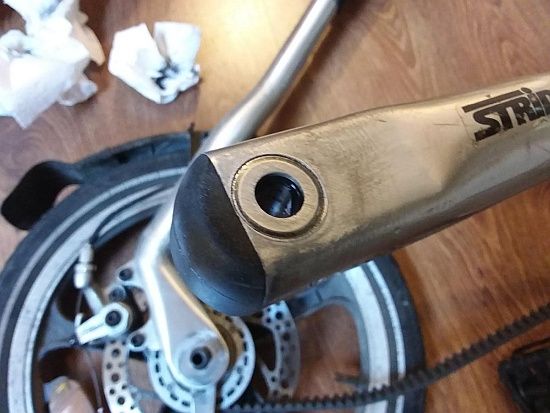
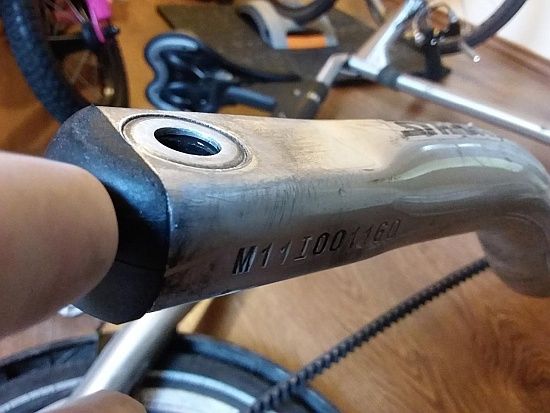
much earlier this year appeared these pics…
At this chance; many thanks to Zoltan from Hungary for the great cooperation!

It has to be said that the tremendous amount of wear on this bottom tube was not caused by the cup spring alone. In fact was also the lower bottom tube bearing totally damaged and just a few bearing balls left (!!) – that led to much more torsion of the bottom tube as usual.

Of course we noticed in advance that the older „crackling noise kit“ would not work on that badly worn frame tube – there was something stronger required.

In the following I’ll introduce the outcome.

II. Parts choice

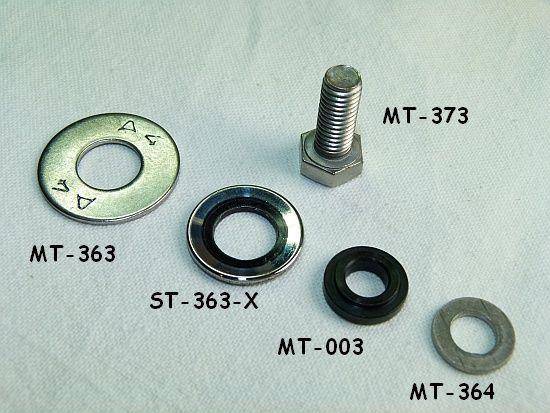
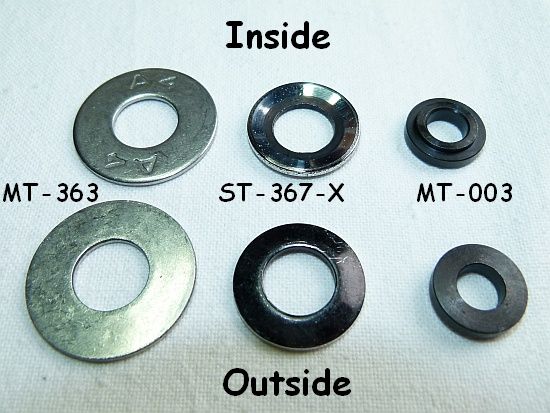
Selected parts are not by Strida respectively self-made, for undoubted identification I’ve created part numbers; their legend is easy to read:
MT means „My things“ – partially standard, but also self-made parts, anyway not original Strida.
ST at the beginning and X at the end: This are modified genuine parts.

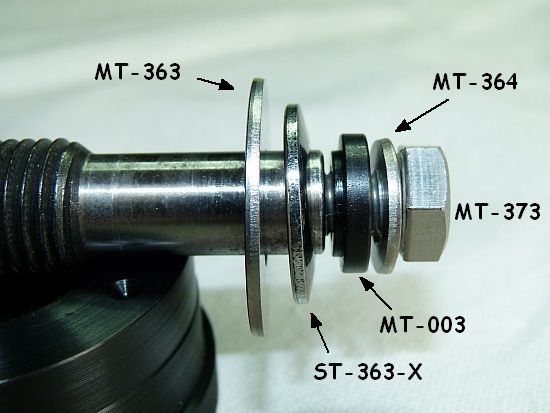
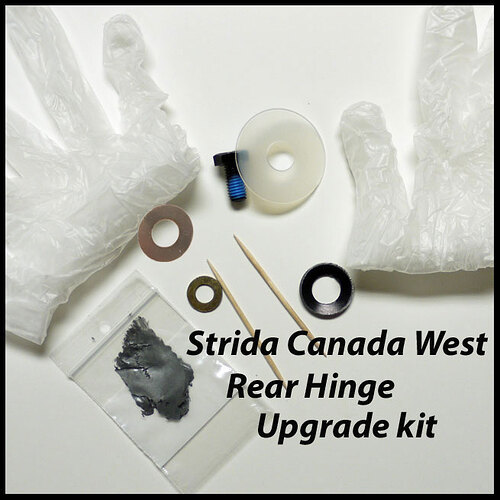
MT-373 Stainless hex bolt DIN 933 M8 x 20 mm, A4-80
MT-364 Stainless washer DIN 125 Ø 16 x Ø 8,4 x 1,5 mm, A4
MT-363 Stainless car body washer Ø 30 x Ø 12,5 x 1,5 mm, A4
MT-003 Recessed washer Ø 16,0 x Ø 12,2 x 4,0 mm Machining steel, burnished and oiled
ST-363-X Modified Strida cup spring, edge polished

Tbc on demand

III. Installation

Please note that the installation of the heavy duty rear hinge kit works similar to the „crackling noise kit“ – but not completely equal!

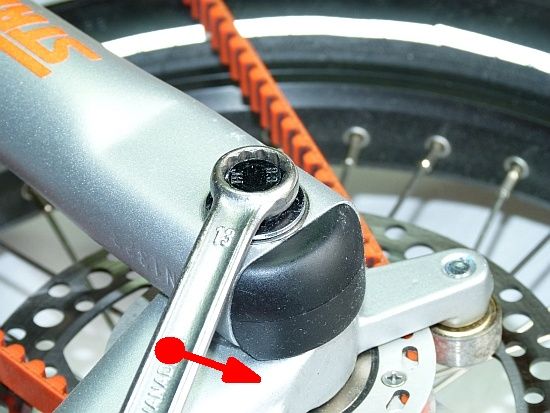
  1. Remove the old parts (key size 13 mm)

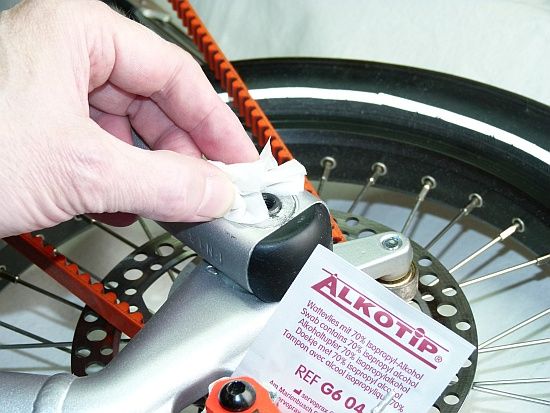
  2. Clean (Alcohol swab) – be aware of Aluminium chips

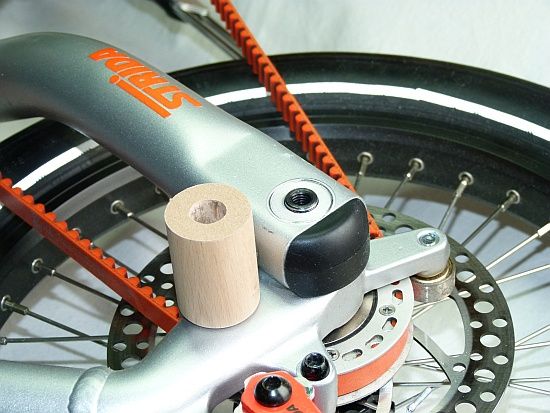
  3. Grind away all protruding burrs (Grinding tool) while avoiding further damage of the frame surface.

  4. Clean again.

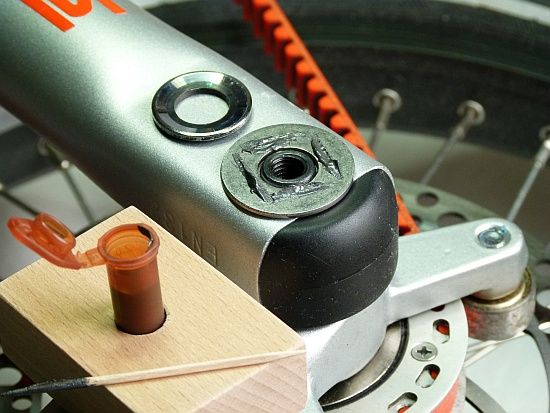
  5. Place the car body washer, the stamped letters in touch with the frame tube. Please note; do NOT apply grease or oil between them!

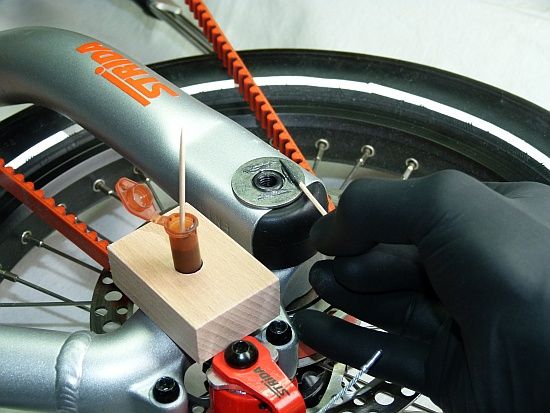
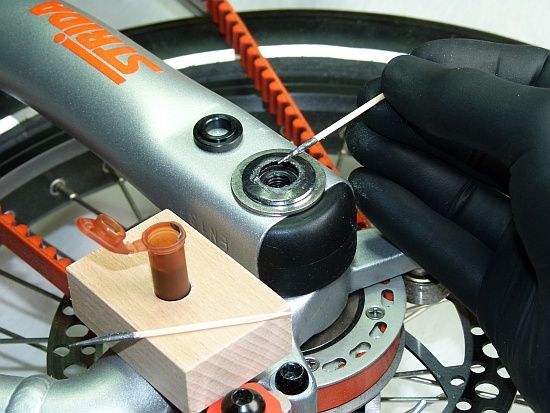
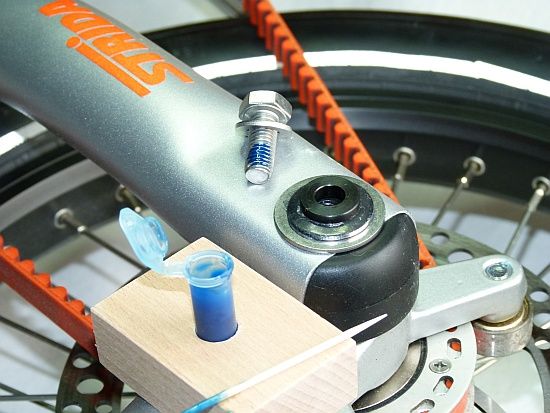
  6. Apply Never Seez (brown capsule) at the outside of the car body washer as shown below. Please note; Never Seez MAY irritate your skin, that was the reason to recommend gloves.

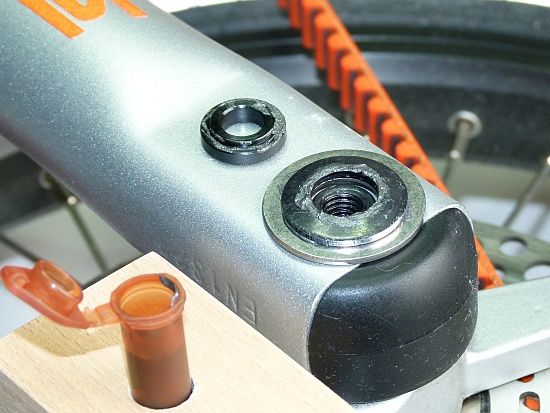
  7. Place the cup spring on the car washer (all black side=outside) and apply a tiny amount of Never Seez at its inner edge and also on the recessed washer.


  1. Slide the stainless washer over the bolt’s thread and apply a small drop of Loctite 243 (blue capsule). Please note; this glue has to cure some time – do NOT fold or ride the bike for a few hours.

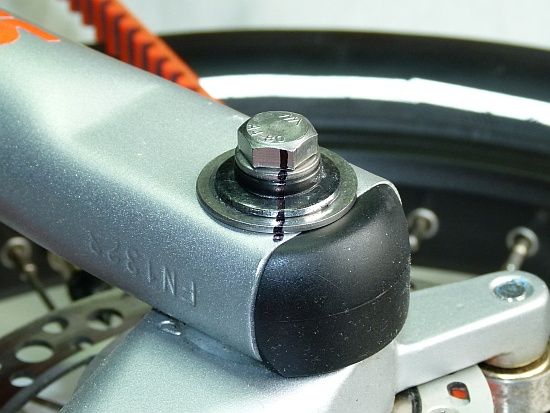
  2. After tightening the bolt to 18 – 20 Nm; you can (if you like to) attach a marking over all parts to check the flawless function.

IV. Appendix

Detail info about the used chemicals can be found here for Never Seez:

http://www.neverseezproducts.com/msds/NSPureNicSpe.pdf

http://www.neverseezproducts.com/bostik-nickel-pure.shtml

and here for Loctite 243:
http://www.loctite.sg/sea/content_data/93815_243EN.pdf

http://www.loctite.co.uk/loctite-4087.htm?nodeid=8802623520769&msdsLanguage=EN_GB&selectedTab=technical

Properties of cup springs/function explanation:

Let’s remind first an unexpected property of cup springs - they are able to generate a huge load within a very short way of engaging.
In other words - tenths of a mm less or more and the tension of the spring will change dramatically.

Our cup springs work - principially - between two “working surfaces”.
That’s at the inner side the frame’s aluminium surface and at the outer the underside of the M8 washer.

So…if we use an additional washer (to protect the frame) between spring and aluminum surface we do also move the “inner working surface” a little bit to the outside.
To be more exact we move the surface for the amount of the washer’s thickness.

We must now take care to move also the “outer working surface” more outside to compensate the added washer’s thickness. Only this way we can achive a preload at the cup spring which is - not completely equal, but very similar - to that of a brandnew bike.

And that’s what the recessed washer does - the recessment’s depth has to be equal to the thickness of the additional washer below the spring.

Additional information about how to create or find the recommended parts and more details will be edited by demand.

Will something like this, if done properly, last pretty much forever, Blackstridaaustria?

No, I do not think so!

Unfortunately, at this point in time, I could not tell how long above solution will work.
Most likely it is necessary to replace the central three parts (cup spring, recessed washer and car body washer) sooner or later.
At least, the costs for the three parts are pretty low - far, far away from that of a bottom tube :smiley:

Dear all,

I purchased my Strida SX in April and just recently noticed clicking noises under load. I searched the web and found out about the rear hinge problems that I confirmed for my bike. The damage of the tube is quite severe already. Due to the lack of Never-seez and Loctite I just disassembled the parts, removed the burrs on both the cup spring and the tube and reassembled all parts with a white TiO2 grease and a stainless steel washer instead of the original one that was totally deformed. I tried to fix the screw with usual instant glue which did not work so when moving the lower tube now all other parts (cup spring, washer, screw) move together with it.
What brought me to an idea: Maybe this behavior is beneficial for the function of the bike! What if the screw head is fixed to the washer, cup spring and the tube of the bike in riding position after tightening it with the correct torque?
If you then move the tube up to fold the bike the screw is unloosed making it easier to fix the tubes in the folding position since the mechanical stress is reduced. When unfolding the bike the screw is tightened again ensuring a stable hinge during driving.

Any comments to this idea are welcome! :smiley:

Dear MRoe,

I do not think that a loose bolt 373 could be beneficial for mentioned behaviour.
You must have overlooked that there is already a part present which overtakes the task to supply sideways play of the bottom tube for folding - that is the cup spring 363.
Would you generate additional play via a loose bolt 373 then you will get too much play and the frame tubes would not any longer hold together in folded position.

The following facts are speaking moreover that definitely for a tight bolt 373:

but such connection is not existent on a Strida.

Dear Blackstridaaustria,

thanks for your comments.
Of course a completely loose bolt is not useful at all. But we are just talking about one third of a full turn since the tube would not move more than that from unfolding to folding position. My fear is more that a repeated unloosing and tightening of the bolt will limit its lifetime due to a wear-out of the thread.

But anyway I now added a thin stainless steel washer to armor the tube and protect it from further damage and will order some Loctite to get the bolt fixed again. That is then close to your solution.

Furthermore I mounted a strong magnet at the upper frame protector to fix the lower tube with it in the folded position to limit the force on the rear hinge just with this plastic clip that Strida offers for the Evo. This works quite well.

Dear Mroe,

I have to say thanks for your interest and your suggestions :smiley:

Could you tell the thickness of mentioned steel washer?
I mean that is very important and exactly that thickness was the reason to create an additional part for my solution (the recessed washer).
To explain that I’ve edited above in chapter IV a few words about cup springs → jump

I do believe that grease is not sufficient for our cup springs.
Crucial for the kit’s proper function is an anti-seizing compound - the brand is of course meaningless.
(I’ve learned to know Never-Seez when I was working in the chemical industry 30 years ago and made since then positive experiences only therefore I’m stuck with that stuff.)

There is also a short private message in your mailbox.

Cheers,

Chris

Hi Blackstridaaustria,

thanks for your comments.

The washer I use is 1,5mm thick but I don’t really get your point. Why is it necessary to adjust the outer surface of the cup spring with a recessed washer? For my understanding you will compensate the thickness of the washer by just inserting the screw a little bit less. As you write above the tension of the cup spring is the relevant parameter that will be assured by the correct fixing torque of the bolt no matter how many washers you add (as long as the minimum insertion depth of the bolt is assured).

I thought the function of the recess of your washer was just to keep the cup spring properly in place since the “armour washer” results in a flat surface at the outer side of the frame without any edge. But since I noticed that my stainless steel washer on top of the cup spring is already slightly deformed to a bowl-like shape it does this job perfectly. :smiley:

I perfectly agree with you that the TiO2 grease does not work properly since the bolt still tightens and unlooses during unfolding and folding of the bike.

So I will order Loctite and an anti seezing compound to finish the job.

Dear MRoe,

many thanks for your feedback.

I don’t like to simply give up - let’s try to sort that out again.

Back to the cup spring and its dimensions, first some facts which can be checked easy at your own bike/parts.

  • The cup spring has an - unloaded - height of ~ 3,0 mm.
  • Material thickness of the cup spring is ~ 1,6 mm.
  • The axle stump does protrude ~ 2,3 mm above the frame.

That means in original condition will the spring be compressed for ~ 0,7 mm.
In other words; the height of the spring will be reduced from 3,0 mm down to 2,3 mm - more or less is impossible with a tight bolt.
Logical fact.
(This 0,7 mm are important, they give us an indication for the originally intended preload of the spring.)

Also it is just logical that a cup springs height can not be lower than its material thickness - a physical impossibility.

So - and what are you doing?

First you raise the cup spring’s height dramatically (by using an underlayer) for 1,5 mm - that means your cup spring is now (unloaded) ~ 4,5 mm high.
And then you compress it down to the axle stump (which has 2,3 mm length) which means (4,5 - 2,3) in sum for 2,2 mm!
We want to achieve about the same preload of the spring like that of a new bike.
And you want to load it for 2,2 mm instead of 0,7 mm :question:

Oh mate - that will never work!

Look at the facts above - it is totally impossible to compress the spring more than its actual thickness - but you want to do exactly that!
Your spring has now absolute minimum thickness of 3,1 mm (yes, the underlayer has to be count in here!) and your bolt will never sit correctly - it can’t because the bolt’s underside doesn’t reach the end of the axle stump, there will always be a gap of about 0,8 mm (3,1 - 2,3).
Moreover that you overtighten the cup spring - which you can see at the deformed stainless washer on top, too.
The deformed washer is obviously the weakest link of the chain - it wants to crawl into the gap to flee from the enormous pressure between spring below and bolts head on top.

You have just one chance to correct this - you MUST elongate the axle stump!
And this is what the recessed part of the recessed washer does - it makes the axle “longer” to compensate the armour shim (the underlayer).

The depth of the recessment has to be equal to the armour shims thickness - ONLY that way it is possible to generate the correct preload of the spring.

Please let go the idea that the bolt 373 could be intended to be loose - that is certainly not the case. 18 Nm torque are tight, but 0,18 Nm and 180 Nm are also tight - and not loose.

Your torque key may click at 18 Nm “correctly” but not because it recognizes the common expected bolt-thread connection - instead it is the immensely raising tension of a nearby flattened out cup spring which forces it to release!

Dear Blackstridaaustria,

thanks a lot for your patience and persistence. I finally understood what you mean.

I was not aware that the 18 Nm is not the torque you need to preload the spring but to tighten the bolt on the axle stump and the preload is just ensured by the gap that is left between the frame and the washer (or the armor washer and the recessed washer in your case).

Sorry for being that dull. :blush:

The only question left is now where to order your heavy duty rear hinge reinforcement kit?
Because I now understood that the recessed washer is the essential part that most likely is not available in a shop and I don’t have the tools to manufacture one by myself.

Thanks in advance.

Dear MRoe - I have to say thanks :smiley:

Never it will be my target to convince - but if you are able to comprehend and agree I’m very happy :exclamation:

That can’t be a problem.
Sadly I couldn’t find any matching standard part to be used as the recessed washer, so I was forced to make this myself.
Also I do not own a store, so I can’t offer the kit (or parts of it) officially.
But what could hinder you or me to arrange that in private?

Regarding that I’m confused that you didn’t react to my private message…

However - it is time now to explain why you should not use exactly that recessed washer:

You are using the original cup spring as it is, right?
(They have an original unloaded height of ~ 3,0 mm).

Please note here that my cup springs were modified (edge broken and polished) and their height is a little bit different (2,8 mm).
Naturally is the difference considered for my corresponding washers - respectively their recessment; it is 0,2 mm less deep.

So I’d recommend in your special case to

  • either replace recessed washer AND cup spring with my parts (because they match together)
  • or I’d manufacture (with the next bunch) a few slightly adjusted recessed washers (with the full recessment of 1,5 mm, matching to your configuration with an original cup spring).

By using a turning lathe are the recessed washers very fast and easy to make.
The finishing process (burnishing), done by a local professional, takes much longer, usually about one week.

Dear Blackstridaaustria,

how do you say in German? “Einen hab’ ich noch!”

I found a possible quick and dirty solution for my problem: An stainless steel M8 lockwasher perfectly fits into the hole of the cup spring and is with a thickness of 1,7mm very close to the material thickness of the cup spring. With the lockwasher I am practically able to “elongate” the axle stump.

But of course your recessed washer is a much more sophisticated solution.

Sorry for not replying your private message what I will do now. I’m simply not familiar with the forum functions.

Edit 05.08.2019:

Many thanks to Ludwig and Martin from Germany - your stimulations told me finally where to find the right path! :sunglasses:

Project now paused due to ground-breaking new insights.
Massively enhanced rear hinge solution already in testing,
details will be edited soon.

:mrgreen:

C’mon dear Chris, you are teasing us for a week now. :smiling_imp:

Hehe, it’s worth it. Chris explained and showed me his new solution in Vienna last week. I like especially the brass element.

You’re funny…we work on this crap over years and you mind about one week?

What do you think how much work it is to transform complex technical procedures into comprehensible words?

I could reply to simple questions if you want, like:

What is the initial cause of all rear hinge issues?

  • Answer: That’s because Ming cycle’s parts tolerances are much too big. :imp:

Sorry for the silly joke. By no means I am pushing you or decrying the process.

Please re-read it as “many thanks for your hard work, it’s very much anticipated”.